Managing Sales Pipeline, Scope and Pricing of Deals
A deal represents a specific opportunity for your services, and ends with a signed statement of work and the beginning of a project. A deal establishes key information about the project like pricing, timeline, team allocations and invoice schedule. Deals are created, moved through stages, configured with details, and then closed - as either won or lost.
Deals are visible to users with either leadership or sales roles.
Deal Pipeline
A deal pipeline is the series of stages that a deal goes through from creation to close. Each deal is represented by a card that can be dragged through the stages.
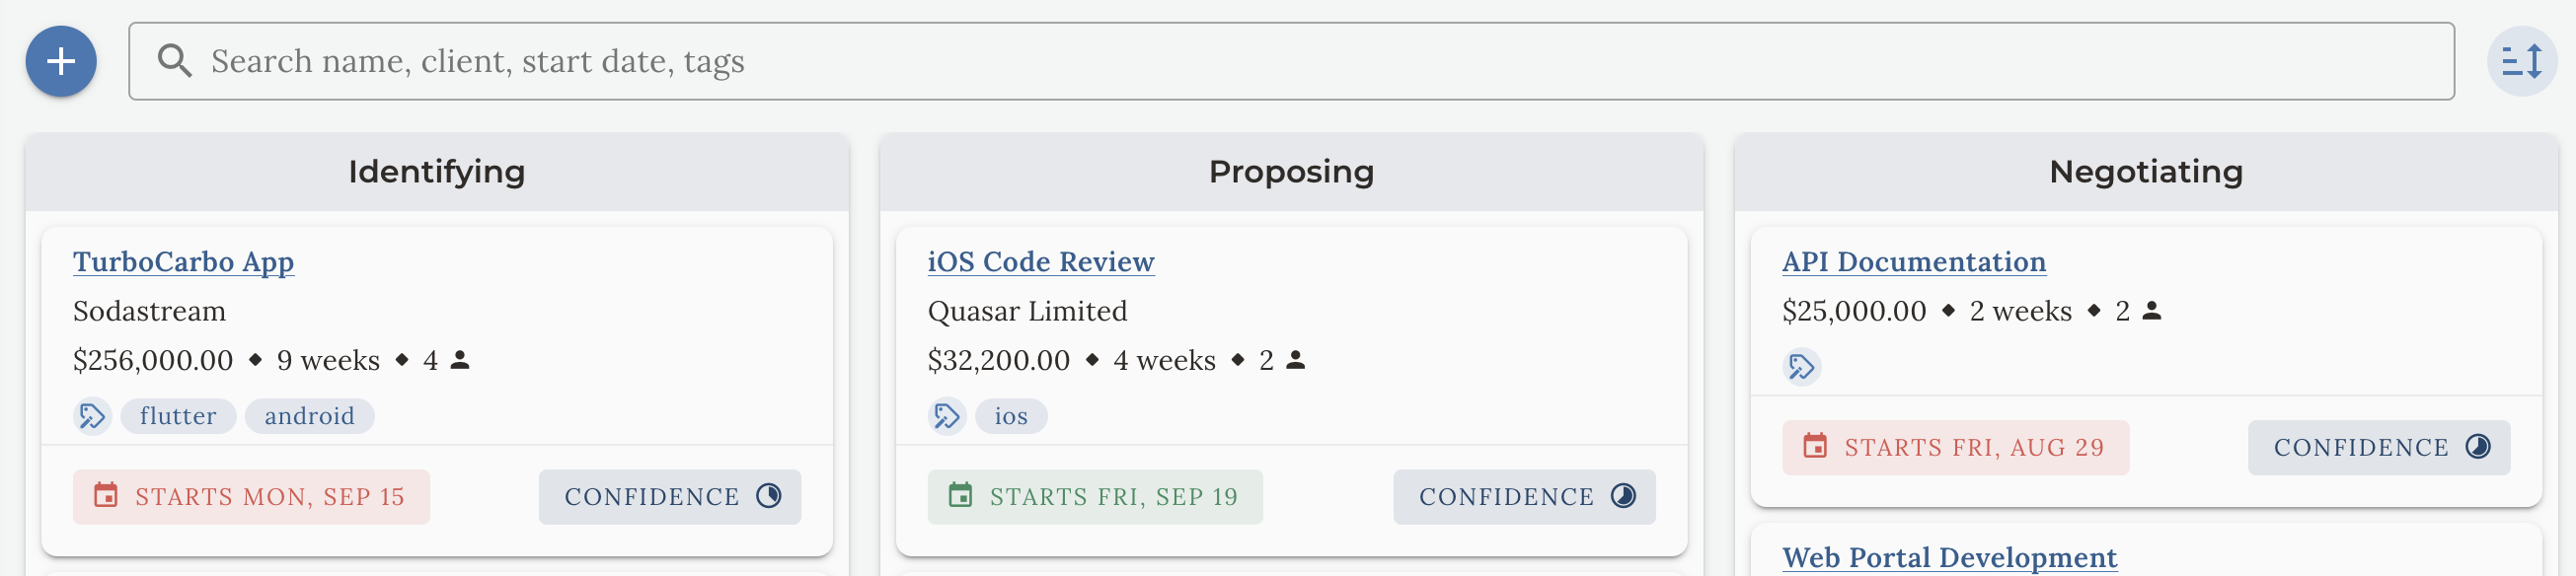
Creating Deals
Create a new deal by clicking on the + button in the top left corner of the deals screen. Enter the deal details in the dialog that appears. All fields except the deal name are optional, and can be edited later by clicking the deal card title. A deal should represent a single statement of work opportunity with a client - if you have multiple opportunities with the same client, create a separate deal for each opportunity.
Deal Stages
The five stages of a deal pipeline are:
- Qualified: when you have first identified an opportunity and are starting to gather information about it.
- Scoped: when you've put together the plan and pricing for the deal, but before you've shared them with the client.
- Proposed: once you've communicated to the client your plan and pricing, and are negotiating the terms.
- Closed Won: when you have signed a statement of work
- Closed Lost: when you have decided not to pursue the deal with the client
Closing Deals
After a deal is closed, it is no longer visible in the deal pipeline. You can always view a deal's detail after it has been closed by clicking 'View Deals' in either Closed Won or Closed Lost drop zones.
If a deal is closed won, a new project is created from the deal's details.
Deal Card Quick Actions
Most deal details are configured in the Deal Details screen. However, you can also configure some details directly on the deal card. These include start date, confidence level, and tags. Learn more about these details in the Configuring a Deal section below.
Searching and Sorting Deals
Search for deals by name, client name, price, start date and tags in the search box above the stages. To perform a search, you enter the field you want to search and the search term separated by a colon. For example,
if you want to search for deals with the name 'mobile', you would enter 'name:mobile'. You can also search for multiple terms separated by spaces. For example, if you want to search for deals with the name 'mobile' and the client name 'apple', you would enter 'name:mobile client:apple'.
Use the sort button to the right of the search box to sort the deals by creation date, anticipated close date, or price.
Configuring a Deal
Configuring a deal is ongoing during the sales process. At first, a deal can just be an estimate of price, timeline and team size. As the deal progresses,
you'll enter more detailed information about your delivery plan. Details such as pricing and invoice schedules are automatically created based on the delivery plan.
To configure a deal, you click on the title of a Deal Card in the Deal Pipeline. This opens the Deal Details screen.
There are four section tabs in the Deal Details screen:
- Project Plan: manage the team allocations, milestones and deliverables for the proposed project.
- Billing & Invoicing: manage the billing method and frequency, and view the proposed invoice schedule.
- Roles & Rates: manage the team roles and their hourly rates specific to this project.
- Settings: manage the deal's metadata such as the client and tags.
The Deal Overview is always visible on all sections of the Deal Details screen. It shows key deal information such as price, project dates and timeline, team size and projected profitability.
Project Plan
The project plan captures the most important parts (timeline, resource allocations, deliverables) of the proposed projects and calculates the price, duration and invoice schedule based on the team roles and their hourly rates. Pricing is automatically calculated from the project plan, and can be adjusted with markup and discounts by clicking the Edit pencil icon next to Price in the Deal Overview section.
There are three view options for planning a project that offer different levels of detail depending on the complexity of the project.
Estimate View
Use the Estimate view when you have very little information about the project. You can specify the estimated price, duration and team size. This is useful in the early stages of a deal when you're just starting to gather information about the project.
Staffing View
Use the Staffing view when your project doesn't require a detailed timeline. In this view, you specify
the billable roles that will be used to deliver the project, and the duration of the project. You may also specify
the amount of time each role will be allocated to the project as a percentage (e.g. a project manager may be allocated 20% of the project time).
Pricing is automatically calculated based on the roles and their hourly rates, and the end date of the project is calculated based on the duration and specified start date.
Timeline View
Use the Timeline view to specify detailed scope and granular team allocations. This view is useful when you have multiple phases of works that require different billable roles, or when you need to specify detailed team allocations for each phase.
The Timeline view looks like a spreadsheet. Each row is a milestone, activity or deliverable. Each column is a billable role on your team.
Timeline View Rows: Milestones, Activities and Deliverables
Every row in the Timeline view is a milestone, activity or deliverable. Each has a name, a start week and a length (in weeks) that are entered in the first three columns.
The start week is relative to the project start date. So week 1 is the first week of the project, week 2 is the second week, and so on.
Project activities and milestones can overlap. If you want to sequence activities, you can do so by setting the start week of one activity to the sum of the previous activity's start week and length. For example,
if 'Project Planning' starts on week 1 and has a length of 2 weeks, the 'Project Kickoff' activity should start on week 3. The timeline bars underneath each activity show the timeline of the activity relative to the project.
You simply start entering this information into each row to start defining activities and deliverables.
You can reorder the rows by grabbing the row handle (the icon in the first column) and dragging it to a new position. This does not change the timeline or team allocations - it only changes the order of the rows.
To add milestones, right-click on the spreadsheet and select 'Insert Milestone Row Below'. A milestone is a grouping of activities - every activity above
the milestone row will be included in the milestone. You can set the name of the milestone, but the timeline and team allocations are calculated by which activities are included in the milestone.
To change which activities are included in a milestone, drag the milestone row up or down to include or exclude activities.
If you have activities that are not part of a milestone, a "Final Milestone" will automatically be created to include all remaining activities.
If you run out of rows to create new activities or want to delete a row, right-click on the spreadsheet and select 'Insert Activity Row Below' or 'Delete Row'.
Timeline View Columns: Roles
For every team member this project will take to deliver, you'll add a Role column by clicking the '+' icon in the column header and selecting the role from a dropdown list. For example, if your project
will take two software engineers and a project manager, you'll select those roles in three separate columns.
Timeline View Columns: Allocation Cells
Each cell in a Role column is an allocation cell. You can enter time in the cell to specify how much time the role will be allocated to the activity or deliverable corresponding to that row.
For example, if you have a row titled 'Discovery' and a column for a 'Project Manager', you can enter '50%' in the cell to specify that the project manager will be allocated 50% of the total time for the discovery activity. This means that the project manager will be allocated at 20 hours per week during the discovery activity.
Time can be entered as hours, days, weeks, or as a percentage of the total time for the activity or deliverable.
You specify the unit by using an 'h', 'd', 'w' or '%' suffix. For example, '20h' means 20 hours, '2d' means 2 days, '2w' means 2 weeks, and '%50' means 50% of the total time for the activity.
You can overlap allocations. For example, a project manager might be allocated to multiple activities. The total and average amount of hours spent per role will be calculated and displayed
for each milestone and for the project as a whole to identify any potential bottlenecks.
Dates and Timeline
When defining a project plan, you define the project's timeline in terms of weeks that are separate from the calendar. The Start Date of the project, which is set in the Project Overview section,
applies that timeline to the calendar. This means that as the Start Date changes, the project plan automatically reflows to show the new calendar dates.
You can view the project on a calendar by clicking on the Calendar View button on the Project Overview. This will show the project plan as a series of milestones, activities and invoices on a calendar.
Billing Options & Invoice Schedule Generation
Billing options are set in the Billing & Invoicing tab at the top of the Deal Details screen. Click on Configure Billing to open the billing options dialog, where you can
set how this project will be billed. By selecting these options and configuring your project plan, the amount and date of each invoice will automatically be calculated for you. (You can always change the amount and date of an invoice during project execution.)
Billing Method
A project is billed as either Time and Materials or Fixed Fee. A fixed fee project has a single price that the client agrees upon and that is the total you will charge. A time and materials project
is billed by charging an hourly rate based on the timesheets your team submits. At the end of a billing period, Treya will automatically calculate the invoice amount based on approved timesheets.
Invoice Timing
This configuration determines when invoices will be sent throughout the project. You can send invoices on a recurring schedule (i.e. monthly, every 4 weeks, every 2 weeks), on milestones, or at the beginning, middle and/or end of a project.
When selecting monthly invoicing, you can choose which day of the month the invoice will be sent. If this day falls on a weekend, it will be moved to the nearest weekday.
You can only select milestone billing if you have defined milestones in your project plan using the Timeline view. Invoice will be scheduled for the expected completion date of each milestone.
When selecting the 'Beginning, Middle, and End' option, you specify any combination of those three options. For example, if you want to send an invoice at the start of the project and at the end of the project, you choose those options.
For fixed fee projects, you can choose to invoice at the beginning of a billing cycle (retainer-based billing) or at the end of a billing cycle.
Down payments
You may choose to collect a down payment based on a percentage or dollar amount, and this will create an initial down payment invoice.
How this down payment impacts other invoices depends on the choice between Advance Fee and Security Retainer. When choosing advance fee, the down payment is subtracted from the first invoice. When choosing security retainer, the down payment is subtracted from the last invoice.
Exporting Deal Terms
When you are sending proposals and statements of work to a client, all of the important data in Treya that you have prepared and has been calculated can be exported into these important documents. Click the 'Copy Terms to Clipboard' button in the Deal Overview. Paste the data into your editor of choice that you are using to construct your SoW or proposal and style as necessary.
Available export data are activities, milestones, calendar dates, invoices, hourly rates, allocations and roles.
Deal-Specific Rate Cards
Your company rates are determined by your Company Settings. However, during negotiation, you may need to change your rates for a particular deal. Navigate to the Roles & Rates tab in your Deal Details to override rates for roles for the selected deal only.
If you use a blended rate, you select the 'Blended Rate' option on this screen and enter the value. By default, the average rate of your assigned roles is used.
Important: a deal's rates are set to the company's rates at the time the deal is created. If you change your company rates, existing deals will NOT have their rates changed. To update a deal to use your current rates, use this interface and choose 'Revert to Standard Rate' for each role you'd like to take on the new company rate.